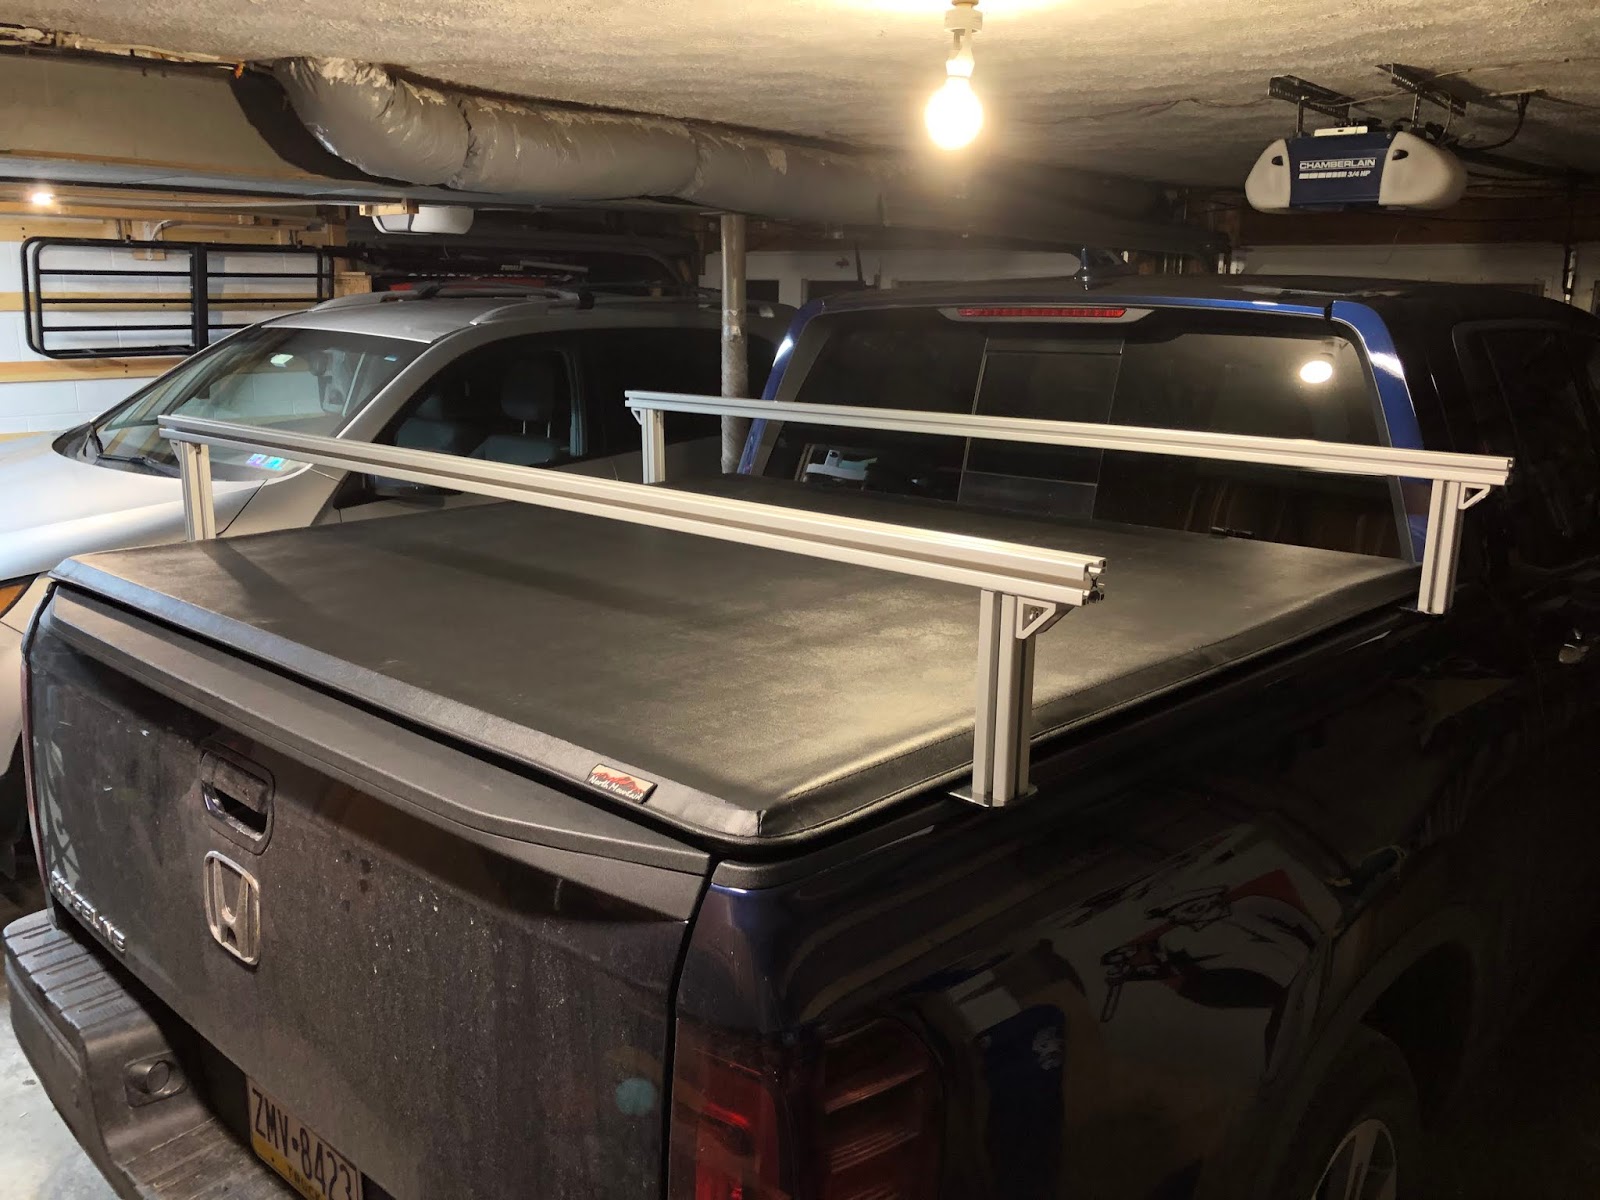
Okay, so I've got a 2019 Ridgeline with the North Mountain rollup soft cover on it. A month after I bought the truck, I took my firstborn to college and stuffed every inch of the vehicle with her...well...stuff. I'm a bit concerned about not having enough space in the spring when she comes home, so I thought that having a rack over the bed might be useful for carrying one of those Thule or Yakima cargo boxes or something similar. Plus I'd like to have the flexibility of using this rack for other things, such as to carry a kayak or mountain bikes, in the future, all while maintaining the usability of the North Mountain tonneau cover. It's probably worth mentioning that I can't go the simple route of having a roof rack, because my garage has a pretty low ceiling so the truck will not fit with a rack on top (as you can see in the pics below).
So first of all, let's talk about the tonneau cover. The great thing about this cover is that its rails sit on the TOP of the bed walls, so they don't interfere with the in-bed trunk lid. But having the rails on top also minimizes your options when it comes to adding other accessories like a bike rack. So it occurred to me...maybe I could make use of the cover's three attachment points on either side both to mount the cover AND to hold the rack.
I played with a few different possible solutions, such as trying to repurpose parts from an old Thule rack as well as trying 1" plumbing pipe, but eventually I found inspiration when someone else on the RL Facebook user group posted an image of a rack they made using extruded aluminum t-track. Bingo! This would give me plenty of flexibility, including the ability to attach other gizmos and doohickeys as time went on. But I was kind of stuck on how to actually mount the t-track to the truck itself.
After playing around with a couple of different ideas involving welding steel plates onto the existing tonneau brackets, a friend and I realized the simple solution. A 3" wide steel plate could lay on top of the existing tonneau brackets and stick out from under the rails of the cover. The plate would have a hole in it to accept a bolt to mount a piece of t-track standing upright, and the rest would be easy. Conveniently that friend I mentioned is one of those "maker" types, and not only does he have all sorts of tools for cutting and shaping the steel, but he also has a powder coating station to put a finish on the plates they don't rust.
So here are some pics of the final product. Overall, I think this is going to be pretty useful. It's unfortunate that the front crossbar is fairly close to the back window, as it would have been better about 8" back, but that's where the attachment points are.


And, to be clear...I'm not a communist. That's a 25-year old rush poster from a fraternity party.
For those of you looking for the details, here you go:
THE MOUNTING PLATES
I picked up a piece of 24" x 3" steel plate from Home Depot and cut 4 pieces out of it. The front ones (closer to the cab) needed to be a little longer than the ones toward the tailgate. The front ones are 7-3/8", the rear ones are 6". Each plate has a 3/8" hole on either end. The inner hole, which goes atop the tonneau bracket, is 1/2" from the edge. The outer hole, where the rack bolts on, is 1-1/8". I used an angle grinder to round the edges and smooth them out before powder coating.
THE VERTICAL T-TRACK
I ordered 1-1/2" square t-track from 8020.net. The verticals are 7-1/2" high, with one end tapped for a 5/16" bolt.
THE HORIZONTALS
Using the same T-track as the verticals, the front bar is 75-3/4" and the back one is 73-7/8". This allowed for a 2-1/2" overhang past the verticals on either end.
BRACKETS
I used standard 2-hole brackets on the outside of each attachment point, and hidden corner brackets (so as not to interfere with the cover) on the inside for extra strength. I may swap those out with another set of 2-hole brackets though, because the hidden ones have these tiny allen wrench bolts that are a pain to get to.
OTHER TIPS
Putting the metal plates underneath the cover rails meant modifying the weatherstripping underneath. I put another layer of weatherstripping underneath to fill the gaps and ensure everything inside stays dry.
I need to order plastic caps for the ends of the crossbars. The ends of the bare bars are kind of sharp.
NEXT STEPS
My next task is to work out what I will use for storage on the rack. I already own a soft rooftop cargo bag - I'll try that out to see how well it fits. Or, I may get a cargo basket to put the bag in. I also need to look at bike racks. I have a couple of old Thule bike holders, but their attachments won't fit these cross bars.